AWS Kinesis & SQS

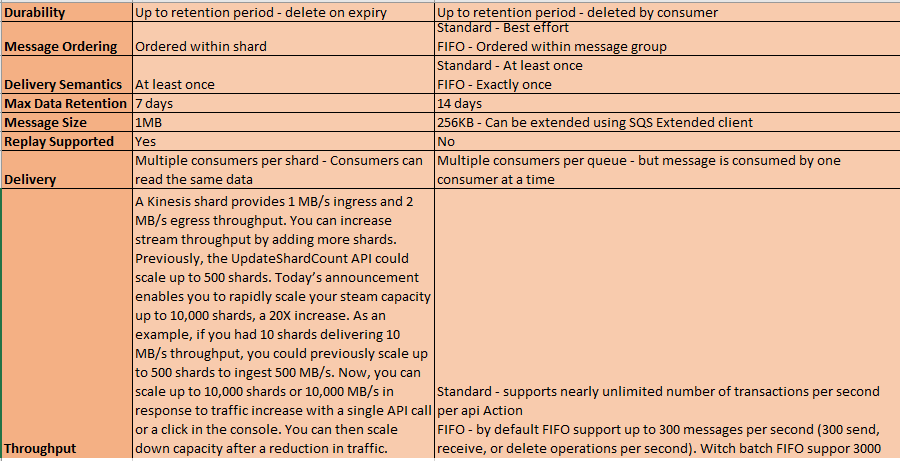
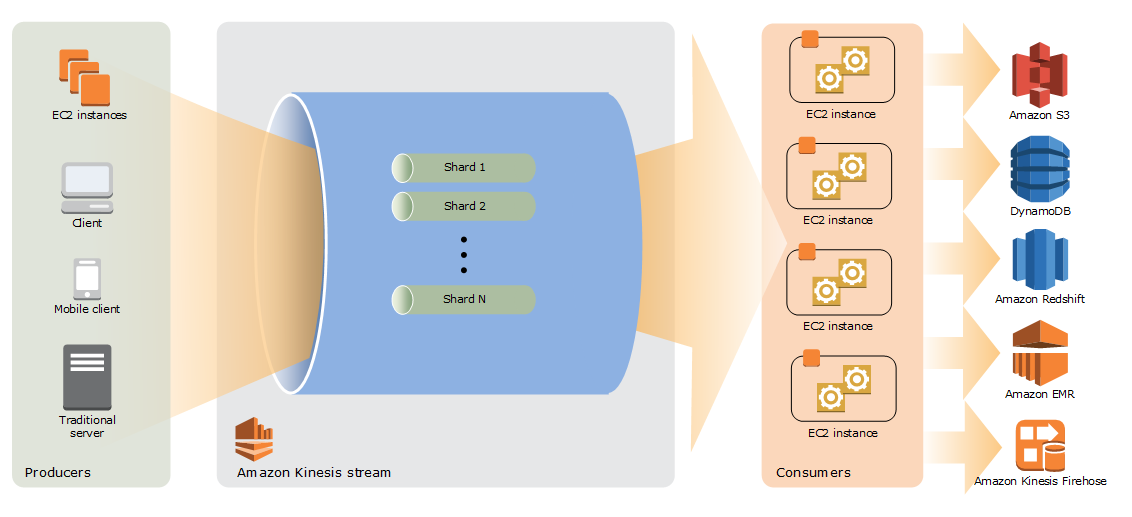
What is Amazon Kinesis Data Streams

Amazon Kinesis Data Streams is a fully managed AWS service that you can use to collect and process large streams of data records in real time.

Key concepts:

  • Data record – A unit of data that is stored by Kinesis Data Streams. Data records are composed of a sequence number, a partition key, and a data blob, which is an immutable sequence of bytes. Kinesis Data Streams does not inspect, interpret, or change the data in the blob in any way. A data blob can be up to 1 MB.
  • Data stream – A resource that represents a group of data records.
  • Shard – A uniquely identified sequence of data records in a stream. A data stream is composed of one or more shards. Each shard provides a fixed unit of capacity.
  • Producer – A source that puts data into a Kinesis data stream.
  • Consumer – An application that gets records from data streams and processes them.
  • Kinesis Producer Library (KPL) – An easy-to-use, highly configurable library that helps you write to a data stream.
  • Kinesis Client Library (KCL) – An easy-to-use, highly configurable library that helps you consume and process data from a data stream.

What happens if producer exceeds ingest values:

 If your data producer exceeds either of those values, Amazon Kinesis Streams raises an exception, and your producer needs to retry records that did not get written successfully. Retrying failed records is a valid approach if the spike is very short-lived. However, to ingest more than 1000 records per second for a longer duration, you need to scale the number of shards in your stream. This can be achieved automatically by scaling the shards.

What is SQS

Amazon Simple Queue Service (Amazon SQS) offers a secure, durable, and available hosted queue that lets you integrate and decouple distributed software systems and components.

Queue types

Standard queueFIFO queue
Unlimited Throughput – Standard queues support a nearly unlimited number of API calls per second, per API action (SendMessageReceiveMessage, or DeleteMessage).At-Least-Once Delivery – A message is delivered at least once, but occasionally more than one copy of a message is delivered.Best-Effort Ordering – Occasionally, messages are delivered in an order different from which they were sent.High Throughput – If you use batching, FIFO queues support up to 3,000 transactions per second, per API method (SendMessageBatchReceiveMessage, or DeleteMessageBatch). The 3000 transactions represent 300 API calls, each with a batch of 10 messages. To request a quota increase, submit a support request. Without batching, FIFO queues support up to 300 API calls per second, per API method (SendMessageReceiveMessage, or DeleteMessage).Exactly-Once Processing – A message is delivered once and remains available until a consumer processes and deletes it. Duplicates aren’t introduced into the queue.First-In-First-Out Delivery – The order in which messages are sent and received is strictly preserved.
Send data between applications when the throughput is important, for example:Decouple live user requests from intensive background work: let users upload media while resizing or encoding it.Allocate tasks to multiple worker nodes: process a high number of credit card validation requests.Batch messages for future processing: schedule multiple entries to be added to a database.Send data between applications when the order of events is important, for example:Make sure that user-entered commands are run in the right order.Display the correct product price by sending price modifications in the right order.Prevent a student from enrolling in a course before registering for an account.

Kinesis vs SQS

Assembly redirects fix

If you ever run into a problem when after updating the library through nuget compilation throws an error of assembly version not found as system is still expecting an older version. This may cause due to the assembly redirects in the code.
One way to fix this is to run the following command in the Package Manager Console

PM> Get-Project –All | Add-BindingRedirect

Second method to fix this issue is to enable the automatic binding redirects in the web apps project.

Automatic binding redirects are implemented differently for web apps. Because the source configuration (web.config) file must be modified for web apps, binding redirects are not automatically added to the configuration file. However, Visual Studio notifies you of binding conflicts, and you can add binding redirects to resolve the conflicts. Because you’re always prompted to add binding redirects, you don’t need to explicitly disable this feature for a web app.

To add binding redirects to a web.config file:

  • In Visual Studio, compile the app, and check for build warnings.
    clr-assemblyrefwarning
  • If there are assembly binding conflicts, a warning appears. Double-click the warning, or select the warning and press Enter.A dialog box that enables you to automatically add the necessary binding redirects to the source web.config file appears.

    clr-addbindingredirect

ng-select multiple drop down with grouping + reactive forms

ng-select is a good npm package to use when we want to allow user to select multiple items from the dropdown.
The help on the official page is not helpful much in case if we are using the ng-select with reactive forms in Angular.
Recently I’ve to use the grouping option with checkboxes and reactive forms.
Below is the code snippet which works for me.

Capture

Most of the code is same as in the help provided with the control

https://ng-select.github.io/ng-select#/multiselect-checkbox

The only problem is it’s not with reactive forms. So to make it work with the reactive forms the code change is to change the [ngModel] with [checked] in ng-template section. We also don’t need [(ngModel)] as it’s replaced by formContralName in reactive forms

Asp Net Core 2.0: resolve error CALL_AND_RETRY_LAST Allocation failed – JavaScript heap out of memory

This is the easiest way to solve this error if someone is using Asp.net Core, Angular, Webpack (AngularTemplateProject)

Expert Code Blog

This error is caused by a memory leak problem of node.js.

On a Visual Studio 2017 Asp Net Core 2.0 project started from the Angular CLI Template, that use WebPack to manage the build process, after some publish builds, due to file size increase, we can get this error:

node node_modules/webpack/bin/webpack.js --env.prod
EXEC(0,0): Error : CALL_AND_RETRY_LAST Allocation failed - JavaScript heap out of memory

To resolve this error we need to expand the memory size used by node.js.

This is possible setting the max_old_space_size parameter on the node command line with the [size] expressed in bytes:

--max_old_space_size=[size]

But how can we set this value into the publish process.

This is possible changing the .csproj file in this way:

  • Open the .csproj of the project that we are publishing.
  • Find the PublishRunWebpack target.
  • Set the value on each Exec Command which refers to node.
  • Save the changes.

For example, if we…

View original post 95 more words

Migrate from ASP.NET Core 1.x to 2.0

I’ve one project made in .net core 1.1 and recently worked on it to move it to .net core 2.0. For this purpose I follow This link.

I’m using HybridAndClientCredentials on the STS server and openid Connect and cookies on the client. Most of the migration is covered by the above link, but I faced issue where most of my claims are missing.

With the ASP.NET Core 1.x, client would have received the claims: nbf, exp, iss, aud, nonce, iat, c_hash, sid, sub, auth_time, idp, amr.

In Core 2.0 we only get sid, sub and idp. What happened?

Microsoft added a new concept to their OpenID Connect handler called ClaimActions. Claim actions allow modifying how claims from an external provider are mapped (or not) to a claim in your ClaimsPrincipal. Looking at the ctor of the OpenIdConnectOptions, you can see that the handler will now skip the following claims by default:

ClaimActions.DeleteClaim("nonce");
ClaimActions.DeleteClaim("aud");
ClaimActions.DeleteClaim("azp");
ClaimActions.DeleteClaim("acr");
ClaimActions.DeleteClaim("amr");
ClaimActions.DeleteClaim("iss");
ClaimActions.DeleteClaim("iat");
ClaimActions.DeleteClaim("nbf");
ClaimActions.DeleteClaim("exp");
ClaimActions.DeleteClaim("at_hash");
ClaimActions.DeleteClaim("c_hash");
ClaimActions.DeleteClaim("auth_time");
ClaimActions.DeleteClaim("ipaddr");
ClaimActions.DeleteClaim("platf");
ClaimActions.DeleteClaim("ver");

If you want to “un-skip” a claim, you need to delete a specific claim action when setting up the handler. The following is the very intuitive syntax to get the amr claim back:

options.ClaimActions.Remove("amr");

Requesting more claims from the OIDC provider

When you are requesting more scopes, e.g. profile or custom scopes that result in more claims, there is another confusing detail to be aware of.

Depending on the response_type in the OIDC protocol, some claims are transferred via the id_token and some via the userinfo endpoint.

So first of all, you need to enable support for the userinfo endpoint in the handler:

options.GetClaimsFromUserInfoEndpoint = true;

In the end you need to add the following class to import all other custom claims

public class MapAllClaimsAction : ClaimAction
    {
        public MapAllClaimsAction() : base(string.Empty, string.Empty)
        {
        }

        public override void Run(JObject userData, ClaimsIdentity identity, string issuer)
        {
            foreach (var claim in identity.Claims)
            {
                // If this claimType is mapped by the JwtSeurityTokenHandler, then this property will be set
                var shortClaimTypeName = claim.Properties.ContainsKey(JwtSecurityTokenHandler.ShortClaimTypeProperty) ?
                    claim.Properties[JwtSecurityTokenHandler.ShortClaimTypeProperty] : string.Empty;

                // checking if claim in the identity (generated from id_token) has the same type as a claim retrieved from userinfo endpoint
                JToken value;
                var isClaimIncluded = userData.TryGetValue(claim.Type, out value) || userData.TryGetValue(shortClaimTypeName, out value);

                // if a same claim exists (matching both type and value) both in id_token identity and userinfo response, remove the json entry from the userinfo response
                if (isClaimIncluded && claim.Value.Equals(value.ToString(), StringComparison.Ordinal))
                {
                    if (!userData.Remove(claim.Type))
                    {
                        userData.Remove(shortClaimTypeName);
                    }
                }
            }

            // adding remaining unique claims from userinfo endpoint to the identity
            foreach (var pair in userData)
            {
                JToken value;
                var claimValue = userData.TryGetValue(pair.Key, out value) ? value.ToString() : null;
                identity.AddClaim(new Claim(pair.Key, claimValue, ClaimValueTypes.String, issuer));
            }
        }
    }

In the end add the last ClaimActions in AddOpenIdConnection options list

options.ClaimActions.Add(new MapAllClaimsAction());

Auto redirect to an STS server in an Angular app using oidc Implicit Flow

Excellent npm package for Angular and Identity Server 4 Implicit flow implementation

Software Engineering

This article shows how to implement an auto redirect in an Angular application, if using the OIDC Implicit Flow with an STS server. When a user opens the application, it is sometimes required that the user is automatically redirected to the login page on the STS server. This can be tricky to implement, as you need to know when to redirect and when not. The OIDC client is implemented using the angular-auth-oidc-client npm package.

Code: https://github.com/damienbod/angular-auth-oidc-sample-google-openid

The angular-auth-oidc-client npm package provides an event when the OIDC module is ready to use and also can be configured to emit an event to inform the using component when the callback from the STS server has been processed. These 2 events, can be used to implement the auto redirect to the STS server, when not authorized.

The app.component can subscribe to these 2 events in the constructor.

The onOidcModuleSetup function handles the onModuleSetup…

View original post 189 more words

No executable found matching command dotnet-ef

If you try to run the dotnet ef command from powershell and see the following error.

No executable found matching command dotnet-ef

You need to do the following steps to fix it.

  • Add the Microsoft.EntityFrameworkCore.Tools and/or the Microsoft.EntityFrameworkCore.Tools.DotNet package libraries, depending if you want to use the PowerShell command or the CLI version. I personally do always install both of them.
<ItemGroup>
    <PackageReference Include="Microsoft.AspNetCore.All" Version="2.0.0" />
    <PackageReference Include="Microsoft.AspNetCore.Mvc.Versioning" Version="2.0.0" />
    <PackageReference Include="Microsoft.AspNetCore.StaticFiles" Version="2.0.0" />
    <PackageReference Include="Microsoft.EntityFrameworkCore" Version="2.0.0" />
    <PackageReference Include="Microsoft.EntityFrameworkCore.Tools" Version="2.0.0" />
    <PackageReference Include="Microsoft.EntityFrameworkCore.Tools.DotNet" Version="2.0.0" />
    <PackageReference Include="Microsoft.VisualStudio.Web.CodeGeneration.Design" Version="2.0.0" />
    <PackageReference Include="Pomelo.EntityFrameworkCore.MySql" Version="2.0.0" />
</ItemGroup>

it will add PackageReference like this

  • We also need to add the reference as DotNetCliToolReference which will add the following references
<ItemGroup>
   <DotNetCliToolReference Include="Microsoft.VisualStudio.Web.CodeGeneration.Tools" Version="2.0.0" />
   <DotNetCliToolReference Include="Microsoft.EntityFrameworkCore.Tools" Version="2.0.0" />
   <DotNetCliToolReference Include="Microsoft.EntityFrameworkCore.Tools.DotNet" Version="2.0.0" />
</ItemGroup>

Don’t forget to change the version as per your current version of the .net Core

API Versioning in .net Core 2.0 via URL

Version is helpful when we want to roll out new features without breaking the functionality of the existing ones. . It can also help to provide additional functionalities to selected customers. API versioning can be done in different ways like appending the version in the URL or as a query string parameter, via custom header and via Accept-header.

In this post, let’s find how to support multiple version ASP.NET Core Web API by appending the version in URL.

Let’s create an ASP.NET Core web API application and first thing to do is to include the Microsoft.AspNetCore.Mvc.Versioning package (Install the latest package or what is suitable to your project from the nuget.org). At the point of writing this article .net Core 2.0 is out and also the final 2.0.0 version of this nuget package.

Once the package is restored, we need to configure it. Next open Startup.cs, add the highlighted lines of code in ConfigureServices method.

public void ConfigureServices(IServiceCollection services)
{
  services.AddMvc();
  services.AddApiVersioning(option =&gt; {
      option.ReportApiVersions = true;
      option.AssumeDefaultVersionWhenUnspecified = true;
      option.DefaultApiVersion = new ApiVersion(1, 0);
    });
}

As you can see, there are 3 different options configured.

  • ReportAPIVersions: This is optional. But when set to true, API returns supported versions information in the response header.
  • AssumeDefaultVersionWhenUnspecified: This option will be used to serve the request without a version. The assumed API version by default would be 1.0.
  • DefaultApiVersion: This option is used to specify the default API version to be used when no version is specified in the request. This will default the version to 1.0.

That’s all for the configuration and setup. Now we will see how to access the versions of the API via the URL path segment.

Query string parameters are useful, but it can be painful in case of long URL and other query string parameters. Instead, the better approach would be to add version in the URL path. Like,

  • api/v1/values
  • api/v2/values

So to do this, we need to put the version in the route attribute. Like,

namespace ValuesController
{
   [ApiVersion("1.0")]
   [Route("api/v{version:apiVersion}/[controller]")]
   public class ValuesController : Controller
   {
     [HttpGet]
     public IActionResult Get() => Ok(new string[] { "value1" });
   }
}

With this change, the API endpoints always need to have the version number. You can navigate to version 1.0 via api/v1/values and to access version 2.0, change the version number in the URL. Simple and looks more clean now.

Deprecated:When multiple API versions are supported, some versions will eventually be deprecated over time. To mark one or more API versions have been deprecated, simply decorate your controller with the deprecated API versions. This doesn’t mean that the API version is not supported. One can still call the endpoint/version. It just a way to make API users aware that following version will be deprecated in future.


[ApiVersion("1.0", Deprecated = true)]

ApiVersionNeutral: attribute defines that this API is version-neutral. This is useful for APIs that behaves the exact same way, regardless of API version or a legacy API that doesn’t support API versioning. So, you can add ApiVersionNeutralattribute to opt out from versioning.

[ApiVersionNeutral]
[RoutePrefix( "api/[controller]" )]
public class SharedController : Controller
{
    [HttpGet]
    public IActionResult Get() => Ok();
}

MapToApiVersion: attribute allows to map a single API action to any version. In other words, a single controller which supports multiple versions say 1 and 3. The controller may have an API action method supported by version 3 only. In such case, you can use MapToApiVersion. Take a look at below code.

namespace ValuesController
{
  [ApiVersion("1.0")]
  [ApiVersion("2.0")]
  [Route("api/v{version:apiVersion}/[controller]")]
  public class ValuesController : Controller
  {
     [HttpGet]
     public IActionResult Get() => Ok(new string[] { "value1" });

     [HttpGet, MapToApiVersion("2.0")]
     public IActionResult GetV3() => Ok(new string[] { "value2" });
  }
}

ASP.NET Core logging with NLog and Elasticsearch

Software Engineering

This article shows how to Log to Elasticsearch using NLog in an ASP.NET Core application. NLog is a free open-source logging for .NET.

Code:VS2017 RC3 csproj | VS2015 project.json

2017.02.08 Updated to NLog.Web.AspNetCore 4.3.0 and VS2017 RC3
17.12.2016 Updated to ASP.NET Core 1.1

NLog posts in this series:

  1. ASP.NET Core logging with NLog and Microsoft SQL Server
  2. ASP.NET Core logging with NLog and Elasticsearch
  3. Settings the NLog database connection string in the ASP.NET Core appsettings.json
  4. .NET Core logging to MySQL using NLog
  5. .NET Core logging with NLog and PostgreSQL

NLog.Extensions.Logging is required to use NLog in an ASP.NET Core application. This is added to the dependencies of the project. NLog.Targets.ElasticSearch is also added to the dependencies. This project is at present NOT the NuGet package from ReactiveMarkets, but the source code from ReactiveMarkets and updated to dotnetcore. Thanks to ReactiveMarkets for this library, hopefully the NuGet package will…

View original post 181 more words